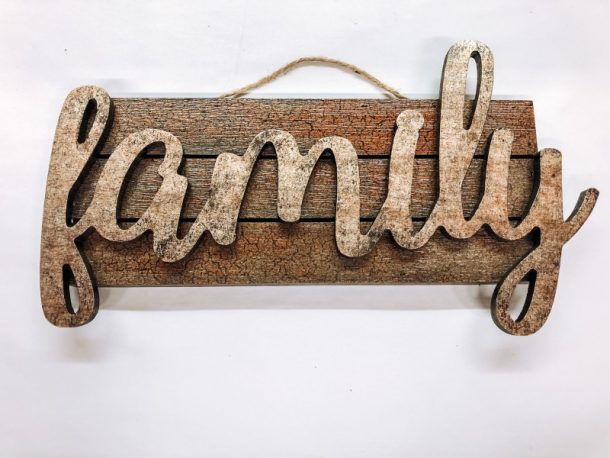
We all love to create and I’m always looking for fun projects to do for myself or to just inspire others to be creative! This family sign DIY project was a blast to create!

Family Sign DIY
While shopping at Hobby Lobby (yes, I love going there and gathering different surfaces to create with), I found a bunch of different plaques and cutout wood words, like family, blessed, etc.
So...
Back at the studio it was time to figure out what to do with all these fun finds. So I started digging through my foils and found a couple that I loved together: Copper Bronze Crackle and Aberdeen.

Well, if you have followed me for a little, you know that my favorite color to paint underneath most of the foils is black so I base coated the plaque and family cutout, painting all sides front and back of everything. A little trick with painting a detailed wood cutout, use a foam sponge brush and you can pounce onto the surface so you don’t get the paint build up on the edges. Also, I love my Bondago Black for great coverage and it’s a primer and paint all in one. Make sure to allow this to dry completely before moving to the next layer. I usually allow it to dry for a couple of hours.
Next...
Grab your Foil Adhesive and apply a layer on all sides that you plan to add the foil to the surface. When brushing on the foil adhesive, I advise to put it on a foam plate and then add a little water, maybe 1-2%. It will help it to brush on smoother and not show brush strokes as much. Remember this product does not self-level and can show all your brush strokes, so try to smooth them out and it is best to apply with an art wash brush.

Once you have the foil adhesive on the surface, set a timer for at least an hour and allow it to dry to a firm tack. Don’t try to rush this step, you could have failure with your transfer if you don't allow the foil adhesive to dry long enough.
Now that you have patiently waited for the Foil Adhesive to dry...
It’s time for the fun part of applying the foils! There are so many fabulous foil patterns and colors to choose from. I transferred the Copper Bronze Crackle foil to the plaque surface and Aberdeen foil to the top of the word Family.

Lay the foil over your project with the pattern/color side facing up (you). Smooth the surface with a soft rag and peak to see how well it has transferred. You can rub harder or grab a plastic bristle scrub brush and scrub only in one direction (not circular). Scrubbing will create the best transfer. Also, remember that foils only transfer in the 90% range, you will never get 100% transfer and that’s why I recommend using Black or a color similar to the foil color so any imperfections won’t be seen as much.
Once you have transferred the foil to the surface you will want to protect the foil with a topcoat. Any topcoat will work, just play with the different sheens to see which one enhances the foils for your project. I would apply at least two coats.
Want to watch and see how I created this sign??
Head HERE!